My awesome, lovely, beautiful mother decided to spoil me by buying me an early birthday present- a kitchen island!
When we moved our new table into its appointed spot, we temporarily left the old one in the middle of our kitchen. This made us realize how awesome it would be to have a little mobile work-station there (and that we really did have space for something in that spot)
I was deciding between:
Flytta
Stenstorp
and Groland.
Ultimately, We really love butcher block, and since we have white cabinets and wanted something that could roll, we decided on the stenstorp kitchen cart. Here it is in action:
excuse the lighting... it's overcast and misty here.
Doak got me/ us a cutting board that happens to fit perfectly over the top of the new cart:
I am very tempted to go buy a few more to cover up the ugly faux-carrera marble laminate countertops in our house.
From what I've read about butcher block, the most important thing to do to take care of it is to condition it with food-grade oil every day for a week, then every week for a month or two, then every month forever. After some quick research, I discovered that the expensive "butcher block conditioning oils" sold in hardware stores are pretty much just pure mineral oil, give or take a small percentage of linseed or orange oils. Know where else they sell mineral oil? in the drugstore, at about $2 per quart, in the laxative aisle. It's supposed to make the wood gorgeous and water-tight.
So if you're ever at our house and you see a big bottle that says "laxative" on it in the kitchen, don't think I'm super weird. it's for the counter-tops.
Sunday, March 27, 2011
gold and orange table.
In my world, every color goes together. I used to think it was a problem that I couldn't pick just one or two to make a color scheme that made any sense in a traditional decorator-y kind of way, but now I embrace the fact that I love just about all of them, and I find myself running away with it.
For example, when we were at the hardware store picking up the gray and white paint for my guest room mirror, Ethan picked up a chip of a bright, BRIGHT persimmon orange. I had no idea what to do with it, but I knew I needed that orange in my life.
Then I remembered this:
I had been using this little Norden Ikea table as a dressing table for a while, but I decided it would fit better in the dining nook of our kitchen than the larger table we previously had there. Perfect orange painting opportunity!
Here's what I made:
An orange table. but wait, notice the gold feet!
gratuitous close-up of the golden feet:
The process of painting wood furniture is not really that fun in and of itself, but it's satisfying when you're finished. Here is how I do it, step by step:
Materials:
mouse sander/ block sander/ sandpaper. 80 grit to rough up wood, 150-200 grit between coats of paint or varnish.
Kilz oil based primer
cheap paint brush (primer is a pain in the butt to clean up, and it will make a mess in your sink. just get a throw-away one.)
re-usable paint brush if using acrylic paint.
small sponge roller
mineral spirits (to clean up anything oil-based)
Paint in color of your choice, eggshell or gloss finish
OR
Spray paint. I've had good luck with Rustoleum.
wipe-on poly
lintless rags, such as rags-in-a-box
old cardboard box or tarp.
1. Sand the surface of the wood lightly if it's already smooth or varnished, to make it easier for the primer to grab onto it. if it's rough, sand the wood until it's smooth.
2. use a tack cloth or a slightly damp rag in a box to wipe off sawdust.
3. prime the furniture. Use several coats of oil-based primer. I use a mini-roller for flat surfaces and a brush for nooks and crannies. There should be a pretty even white surface once finished.
4. wait a day for the primer to completely dry. More if it's cold or humid. Then sand down lightly with 150 or 200 grit sandpaper. this is to get rid of brush marks. Wipe dust off with a paper towel dampened with mineral spirits.
5. paint the piece. If using spray paint, use long, wide strokes of spray, and wear a mask. it is less likely to have awkward spots on the piece if you go slightly off the piece before turning directions with the sprayer.
- if using paint in a can, you can basically use the same technique as with primer; sponge roller for large flat surfaces, brush for nooks and crannies.
6. if there are large texture variations after painting (happens especially on a hot day) then you may need to sand again, lightly. wipe down table with cloth dampened in water (for acrylic paint) or mineral spirits (for oil-based paint/ most spray paints)
7. for a glossier/ more durable finish, use poly. I like minwax wipe-on poly because it's idiot-proof. just use a lint-free disposable towel (rag in a box or something similar) and wipe it on. However, this may make pure white paint look slightly yellow.
8. let it dry, thoroughly.
For cleaning up, anything oil based can be cleaned with mineral spirits, acrylic (water-based) can be cleaned with soap and water. If oil based primer gets in your hair, it is going to stay there. if something is stinky (oil based paints, spray paint, poly) it is probably flammable. for safety, fill an old pickle jar with water and throw any rags soaked in flammable things (poly, mineral spirits) into it.
As an aside, most of the painted furniture I've put on this blog does not look anywhere near perfect, because I am impatient. once I get bored of sanding, the piece is officially declared smooth enough. If I'm bored of painting, I can ignore a slight color variation somewhere.
Saturday, March 26, 2011
Sorry
I have not posted in two weeks. Things have been crazy at work. In free time we've planted our spring garden, but I've been too pooped to take any pictures! I will post some as soon as I can.
Wednesday, March 16, 2011
Yesterday was one of my days off for the month, so I decided to run some errands. My sewing machine had not been working right so I decided to take it across town to a repair shop, 25 minutes away.
I take it in to drop off. The repairman took one look at it, said "you have the needle in backwards", turned the needle around, and proceeded to show me that my machine worked perfectly. Cue me feeling like an idiot.
These are the trials of a self-taught crafter. At least the repair was free.
I take it in to drop off. The repairman took one look at it, said "you have the needle in backwards", turned the needle around, and proceeded to show me that my machine worked perfectly. Cue me feeling like an idiot.
These are the trials of a self-taught crafter. At least the repair was free.
Monday, March 14, 2011
Vanity
I'm not talking about the deadly sin. I'm talking about the incredibly imperfect piece of furniture I just made for our bedroom.
I used these plans from knock off wood. And let me tell you my friend, it was a day of misadventures. just imagine many, many skinny wedge shaped pieces of lumber on the floor because I could not for the life of me get a true 90 degree angle. Seriously... what they will do for you for FREE at Home Depot in about thirty seconds took me three hours. I will not be making any more furniture for a while. Here is a picture of me in action, looking like I know what I'm doing. They say a picture is worth 1,000 words, but if this picture were talking, it would be telling you a flat out lie.
After I built it (with much help from Ethan), I primed it with oil based primer, waited a couple of days, and sprayed it white with Rustoleum. It looks pretty good in the picture... just don't zoom in too close!
I added a little brass lamp from the thrift store with an Ikea shade. Everything else I already had. Here is a picture of my previous vanity area:
I decided to move the table to our kitchen and shift the bed over about 10 inches to make the room feel bigger and to make one of the windows seem less oddly-placed. Before:
After:
I'm finally starting to like this room. It felt so ramshackle for so long!
Thursday, March 10, 2011
that's amore.
The other day, I made lasagna. The recipe called for about half a box of noodles. But I don't do things by halves, so I made the whole dang box. Today, Ethan came up with a fantastic use for those leftover noodles.
We kept the noodles in the fridge in a freezer bag with a little bit of olive oil (to prevent sticking together).
First, he cut up the noodles into squares, and fried them up until crisp with a whole lot of garlic (can't get enough of it, ever.)
Once they were crispy, he sprinkled the crispy lasagna squares with a little bit of sea salt and parmesan.
I made a spread out of half chevre, and half home-made pesto. The combination was glorious. I did not want to share any.
Wednesday, March 9, 2011
my little stool.
Recently I decided to try and make myself a (very) simple vanity for the bedroom. It had to be pretty narrow, medium wide, and most of all, simple. The vanity remains a work in progress (built, but not painted yet). When I saw the scraps, I decided that I should make myself a litte upholstered stool.
How I made it:
1. two scrap pieces of 1x12 pine, cut to square (top and bottom, two rectangles of even length for sides (I think they were like fifteen inches long?).
2. Screwed them all together with wood screws.
3.I used an old cut up towel across the top (although if I were being proper and not cheap I could have used batting), and stapled three sides down. then I stuffed some batting under the towel to make it cushiony, and stapled the fourth side down
4. Arranged fabric across the top and around the sides, held in place with thumb tacks while working, and whip-stitched all the seams using strong embroidery thread.
The fabric was some that my friend Aaron brought back from Africa as a souvenir, and has been sitting unused in my fabric pile for quite some time. I think it looks pretty cute.
Total cost for this project: $0.00.
Imagine my surprise then, the other day, when I was perusing the offerings of Anthropologie and stumbled upon this:
not exactly the same, but pretty darned close. total cost for this ottoman: $200.00.
not bad for an afternoon project!
Tuesday, March 8, 2011
peach blossoms!!!
Monday, March 7, 2011
Office reveal... for now.
Up until the past month or so, my office/ guest area has been a big old hot mess. I used the room occasionally to do some sewing, and we kept the laptop in there about half the time. The furniture was all "make-do" furniture, but really nothing that I would have chosen for myself. For example, we were using the center part of a giant 1980's wall unit (with VHS storage) as a laptop desk. it was huge and incredibly non-functional and messy.
As I've recently mentioned, about a month ago I found out that we're staying in Dallas until at least July of 2014. Since we love this little house, and we hate moving, I decided that we would no longer just make do with furniture that didn't make any sense... we needed to make the space ours and make it useful.
Here's the sorry excuse for a work area I had before:
That semi-nice looking desk was actually a crappy piece from Bombay outlet about 10 years ago that was way past its prime. I had already frankensteined some giant bolts into one of the legs to keep it from falling over, and it still had to lean in a corner in order to really be at all sturdy. We were also seriously lacking in storage, as evidenced by the piles and bags that are evident underneath our old desk. not pretty.
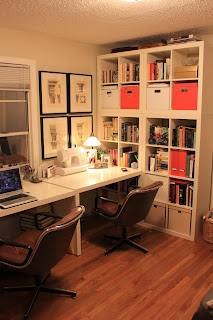
And our new work area:
we can spread out. we can work side by side! we have room for all our books, my yarn, Ethan's leather samples, and the occasional Lego motorcycle. The desks and bookcases are from the Expedit line from Ikea. We were originally going to get one large 5x5 unit behemoth, but they have been out of stock all over the country for about a month. So we decided on 2 2x4's stacked with 2 2x2's. I think I like this better in the long run, and it will be more versatile whenever we DO move out of this house, and as our family grows.
The chairs are probably my favorite part of the room. They're the Pollock Executive Chairs that I got for $19.19 a piece from Garland Thrift.
Isn't my little sterling silver toast-rack-turned-mail-holder cute? This was from Salvation army one fateful morning when I got a TON of awesome stuff, and then wondered if I was maybe becoming a hoarder.
I have already shown this picture before, but why not show it again? this is the thrifted bench and mirror that I made over. This wall is where the behemoth wall unit used to sit and do absolutely nothing.
on to the bed area, which is still a work in progress.
this was the daybed before. It was okay-looking in this picture, but in reality, it only looked acceptable as long as no one sat on it. The cover would constantly shift forward, and it was too short, so there were about 6 inches of ugly exposed trundle bed at the bottom of it. Also, I was sick and tired of all the beige.
This is my for-now solution. I took a Fjellse bed and sawed off the headboard to make it into a platform daybed.
I need to figure out what type of fabric I want to use to upholster the frame and make a matching mattress cover and pillow covers, but in the mean time I'm using just plain old cheapo sheets.
In my mind, it's going to end up looking something like this:
but with back pillows. Am I crazy? possibly. So crazy it just might work.
This room makeover has completely changed where we spend our time in this house. The room used to be a combination of storage area and wasted space, and now we use the room almost as much as we use our living room. Great for a morning cup of coffee, a nap (I hate napping in my actual bed for some reason), or working.
Subscribe to:
Posts (Atom)